StoreXmas Plus
Theme Documentation
- By: Theme Freesia
- support: ThemeFreesia Forum
Please Rate Us For StoreXmas Theme
Thank you very much for choosing our Theme.
If you like this Theme, Please (Rate Us)
Installation
Step 1 WordPress Plugin Installation
To install this plugin, you must have a working version of WordPress already installed on your server. WordPress is well-known for its ease of installation.
https://codex.wordpress.org/Installing.WordPress. Please visit this link for installing WordPress.
Step 2 Installation Plugin Through Dashboard (Easy)
- First download a zip file from Account Page .
- Login as an admin and go to Site administration > Plugins > Install plugins
- Click the button ‘Upload plugins
- Select the zip file you have downloaded and install it
- Activate it
Step 3 Manual Installation using FTP (Advanced)
- First download a zip file from Account Page .
- Unzip storexmas-plus.zip file at your PC
- Access your host web server using your favorite FTP client (such as Cyberduck or FileZilla etc).
- Upload whole folder inside public_html/wp-content/plugins/storexmas-plus(folder) and Do not change directory/folder name.
- Log into your WP admin paneland click on the Appearance->plugins tab.Now click on the StoreXmas Plus to activate it.
Header Setup
Step 1 Upload Logo/ Fav Icon/ Web Icon
Go to Dashboard > Appearance > Customize > WordPress Settings > Site Title & Logo Options > Upload Site Icon & Site Logo
Step 2 Setup Menu
- Go To Apperance > Menu
- Create a new menu by clicking on create a new menu
- Add your menu items as pages/ Category/ Custom Url in left side menu
- Choose “Main Menu” from below Checkbox
Step 3 Setup Social Icons
- Go To Apperance > Menu
- Create a new menu by clicking on create a new menu
- Add your menu items as Custom Url in left side menu
- Choose “Add Social Icons Only” from below Checkbox
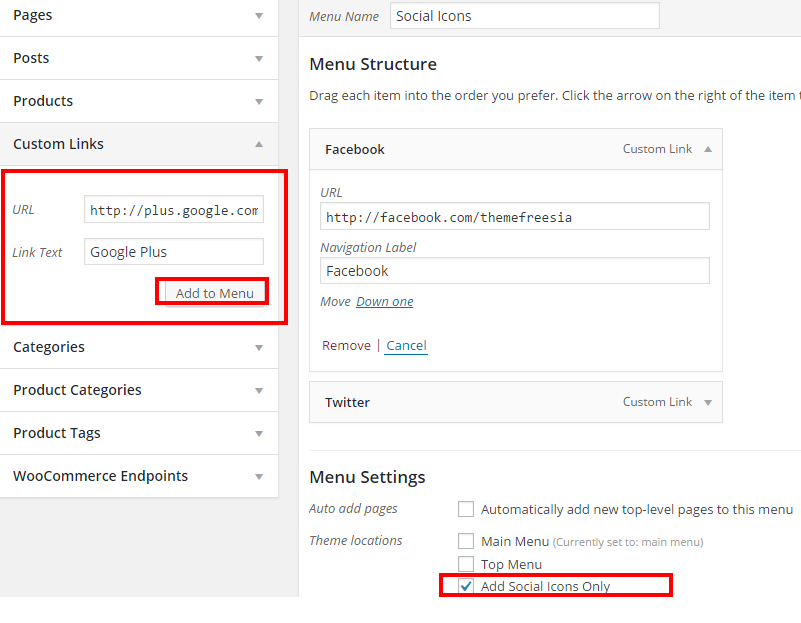
Step 4 Setup Top Information at Header or Footer Widgets
Go to Dashboard > Appearance > Widgets > Drag Text Widget/ Custom HTML at Top Header Info/ Footer Column 4 Sidebar
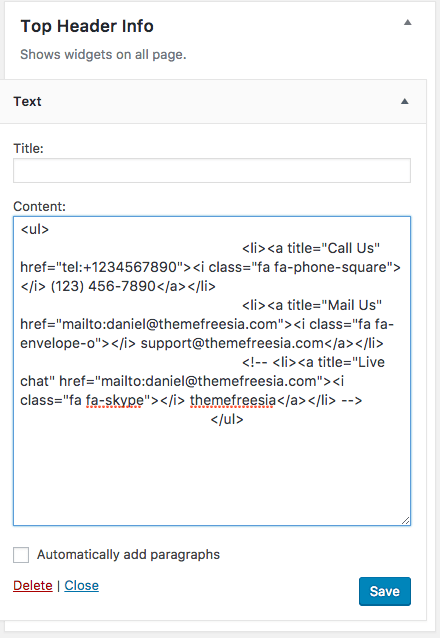
paste Below html Code and change according to your needs
<ul>
<li><a title="Call Us" href="tel:+1234567890"><i class="fa fa-phone-square"></i> (123) 456-7890</a></li>
<li><a title="Mail Us" href="mailto:[email protected]"><i class="fa fa-envelope-o"></i> [email protected]</a></li>
</ul>
Importing the Demo Content
Note: This Demo Importer plugins is only for Plus users. If you are using free themes then download importer plugins from free instruction page. So we recommended to use free demo importer for free users and Plus demo importer for plus users. Also this importer plugin is for fresh themes who doesnot have anything to loose from their website. If you have existing site then don’t use this plugins to import dummy content
- Install all recommended plugins to look exactly as in our demo
- Download Theme Freesia Demo Import and install it as a plugin
- Click on Dashboard > Appearance > Import Demo Data
- Click on Import Demo Data
Once you have imported the demo content delete One Click demo Import plugin
Setup Frontpage/ Blog as in Demo
Setup Front Page Features (Brand/ Promo)
- Install WooCommerce Plugin and activate it. Create products category and upload Category image.
- Create WooCommerce Products with featured image
- Repeat this process for other products too.
After creating Products with featured image Go to Dashboard > Appearance > Customize > Frontpage Template > Product Featured Brand/ Product Category > Select Product Category just now you have created
Front Page Template Section
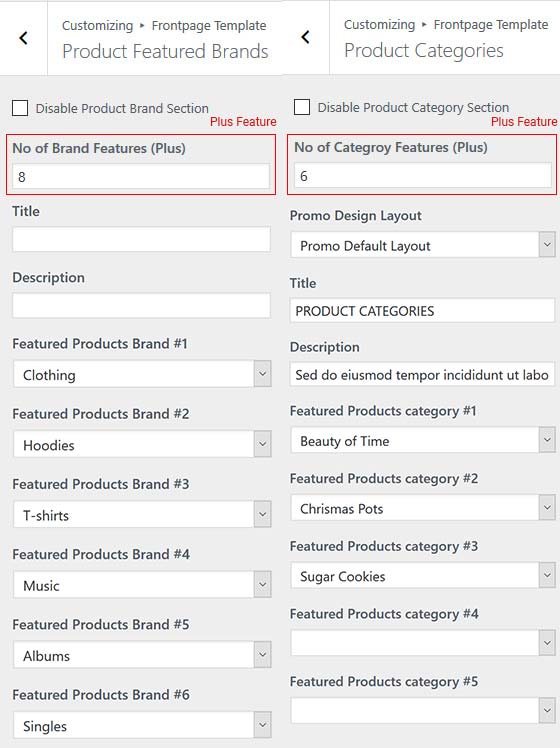
Custom CSS
You can add your custom CSS that will overwrite the theme CSS. Go to dashboard >appearance > Customize > Additional CSS
Setup Slider
- Create Category/ WooCommerce Category > Make your Post/ WooCommerce Product and select category just you created.
- Add featured Image, Title and Content
- To display Slider Go to Dashboard > Appearance > Customize > StoreXmas Slider Options > Select Category Slider/ Product Category
Slider Settings
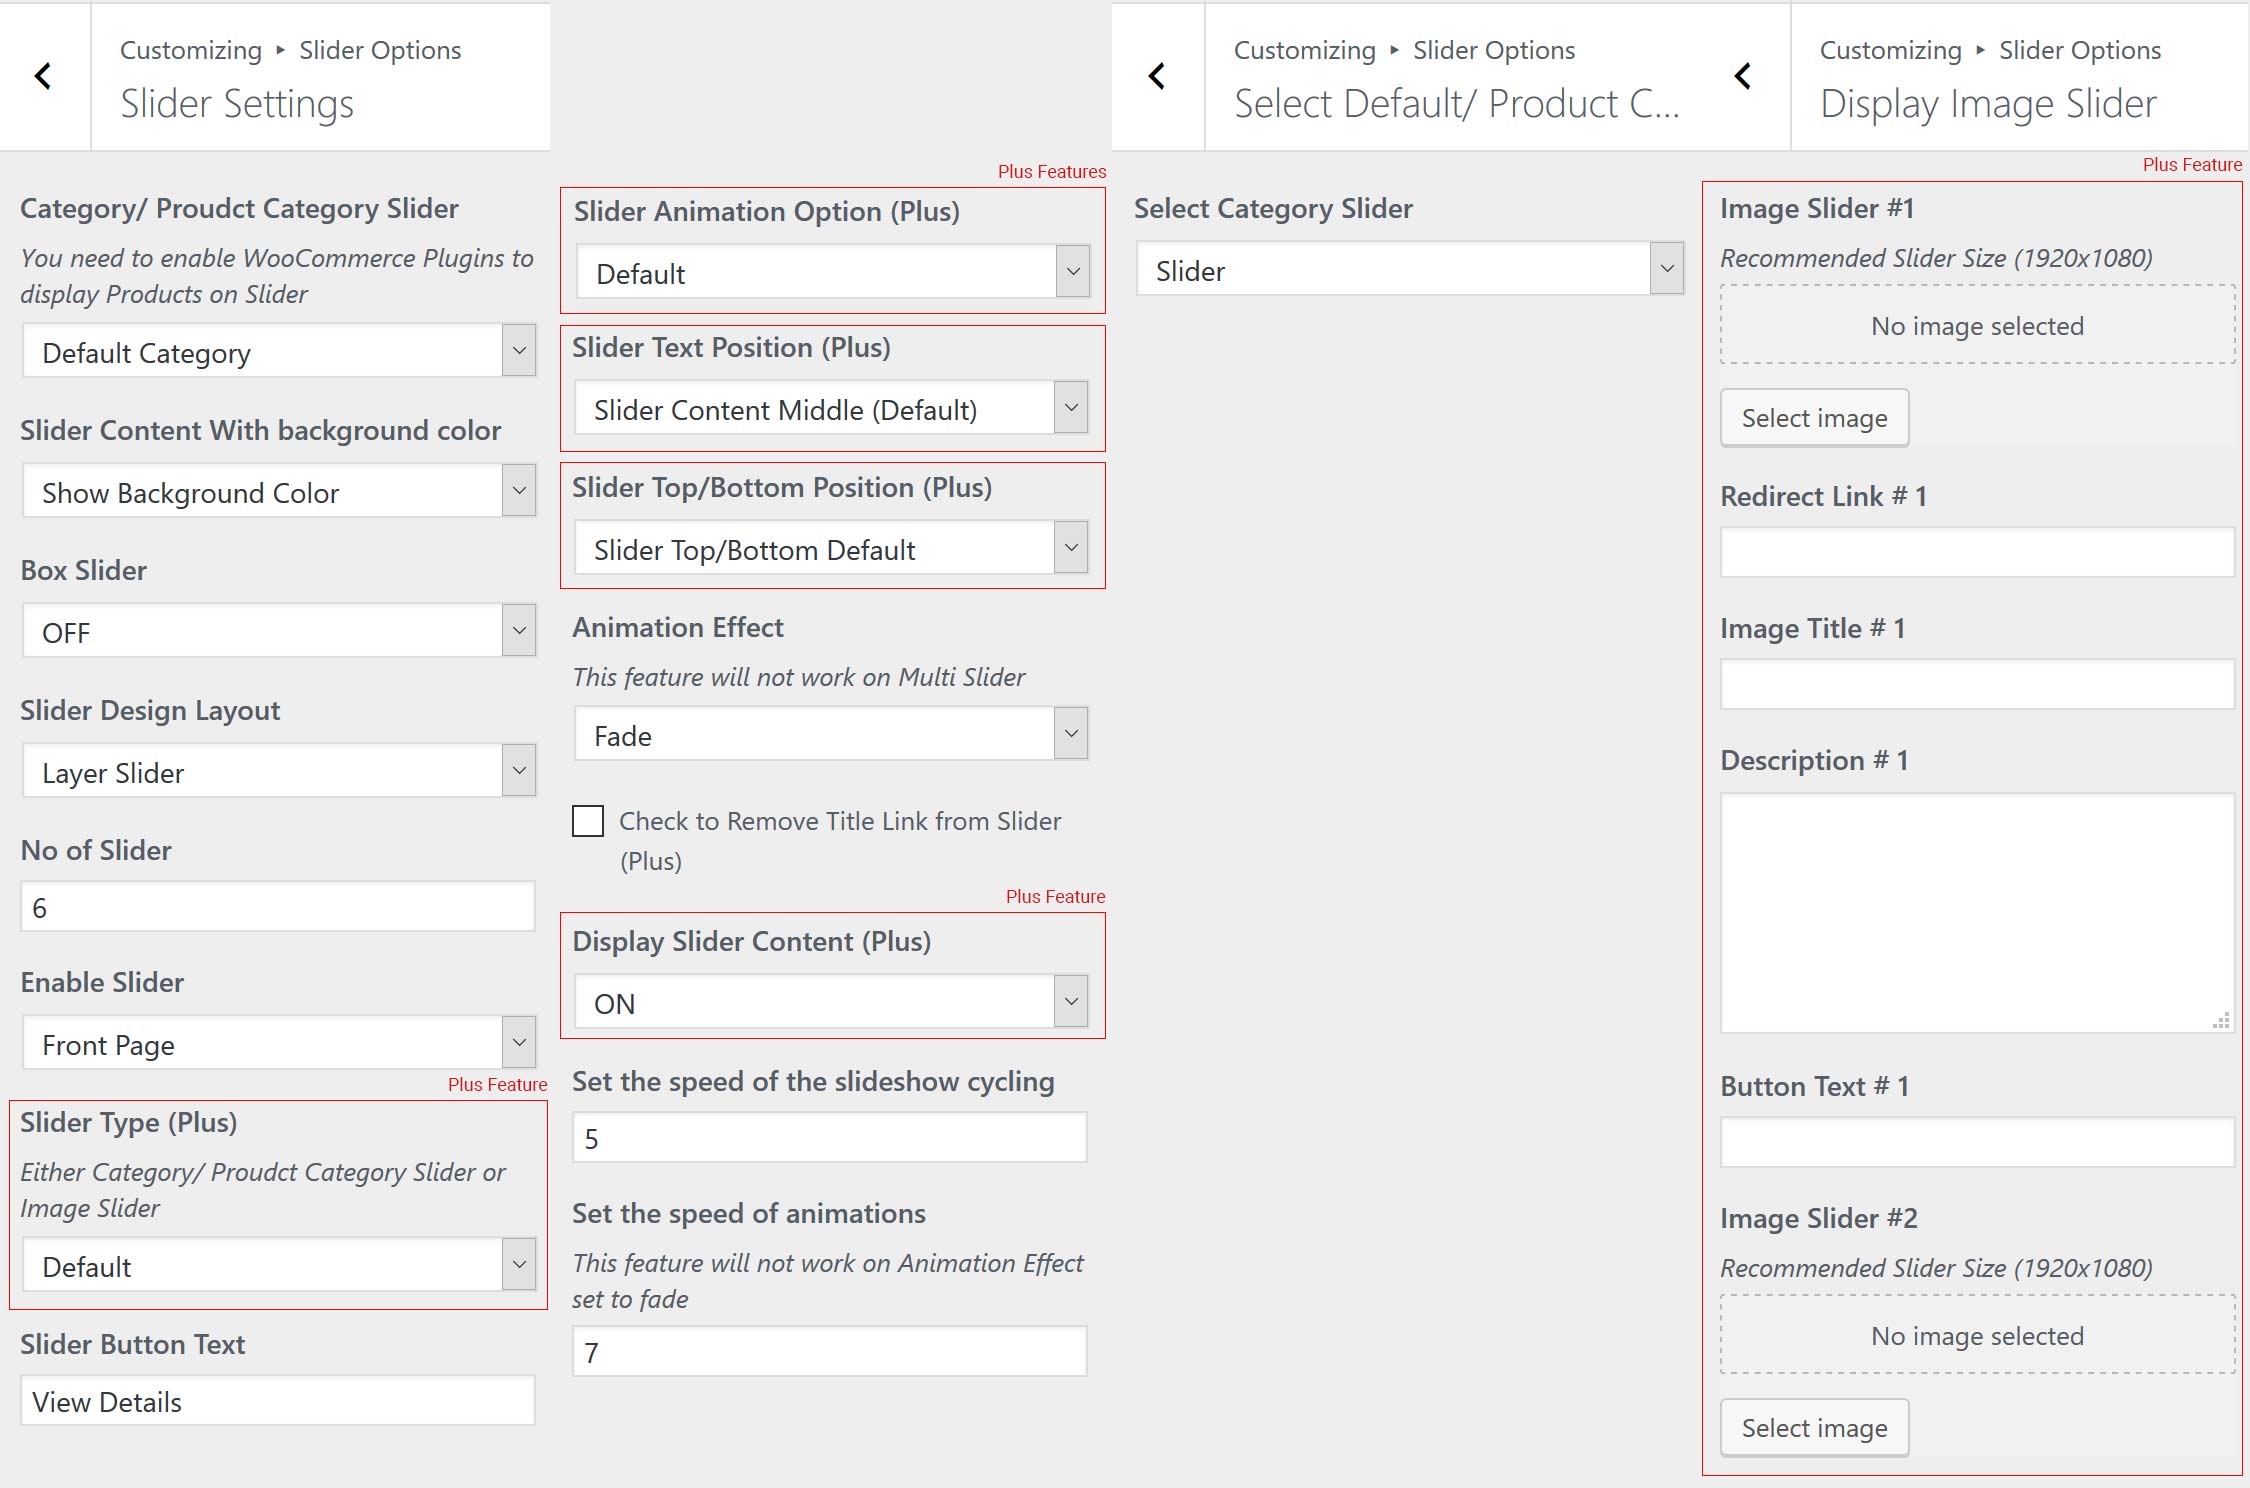
- To display Slider Go to Dashboard > Appearance > Customize > StoreXmas Slider Options > Slider Settings
- To display Category Slider (by default) Choose Category/ Product Category Slider Choose Default Category from DropDown
- To display Product Category Slider Choose Category/ Product Category Slider Choose Product Category from DropDown
- To enable slider, select Frontpage or Entire Site option under Enable Slider
- Click on Save & Publish
Theme Options
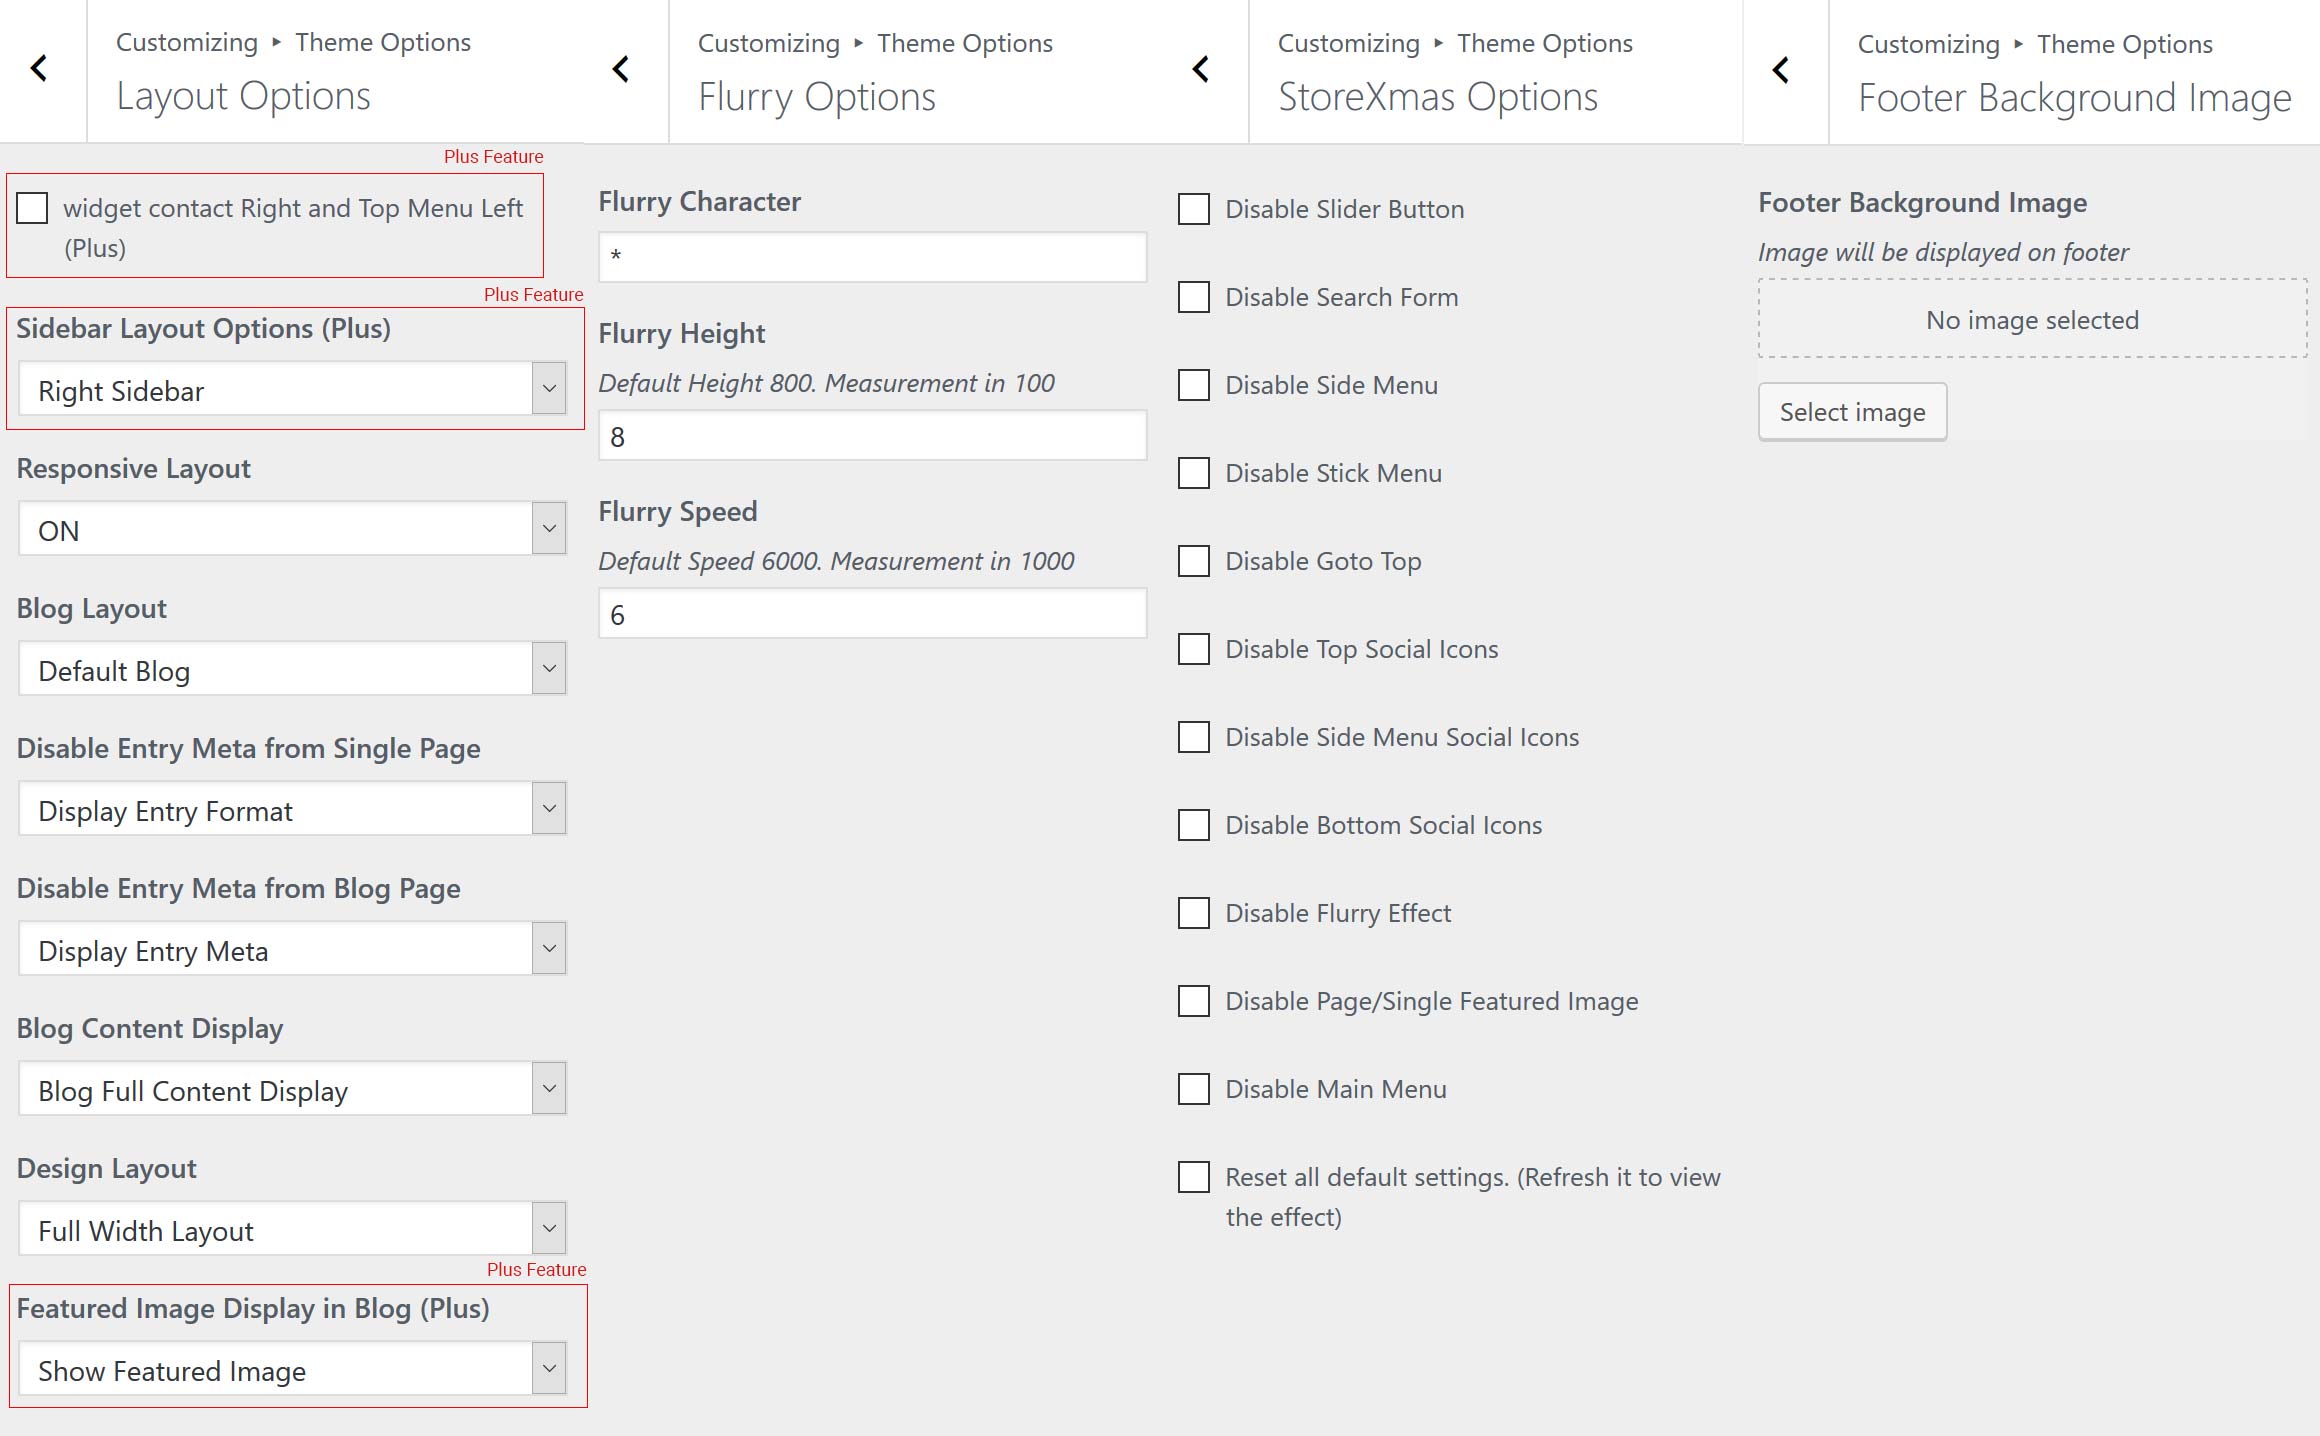
Layout Options
- Go to Dashboard > Appearance > Customize > StoreXmas Theme Options > Layout Options
- Blog Content Display
- widget contact Right and Top Menu Left (Plus)
- Sidebar Layout Options (Plus)
- Featured Image Display in Blog (Plus)
- Select responsive layout on/off
- Select Blog Layout to view image in medium and two column
- Disable Entry Meta from Single Page
- Disable Entry Meta from Blog Page
- Blog Content Display shows excerpt/full content
- Set your design layout as fullwidth or boxed or small boxed layout
Flurry Options
- Go to Dashboard > Appearance > Customize > StoreXmas Theme Options > Flurry Options
- Flurry Character to display any character
- Flurry Height to display flurry
- Flurry Speed to set the speed of flurry
Theme Options
- Go to Dashboard > Appearance > Customize > StoreXmas Theme Options > StoreXmas Options
- Disable Slider Button
- Disable Search Form
- Disable Side Menu
- Disable Stick Menu
- Disable Goto Top
- Disable Top Social Icons
- Disable Side Menu Social Icons
- Disable Bottom Social Icons
- Disable Flurry Effect
- Disable Page/Single Featured Image
- Disable Main Menu
- Reset all default settings. (Refresh it to view the effect)
- Click on Save & Publish
Footer Background Image
- Go to Dashboard > Appearance > Customize > StoreXmas Theme Options > Footer Background Image
- Upoad it
- Click on Save & Publish
ScreenShot of Theme Options
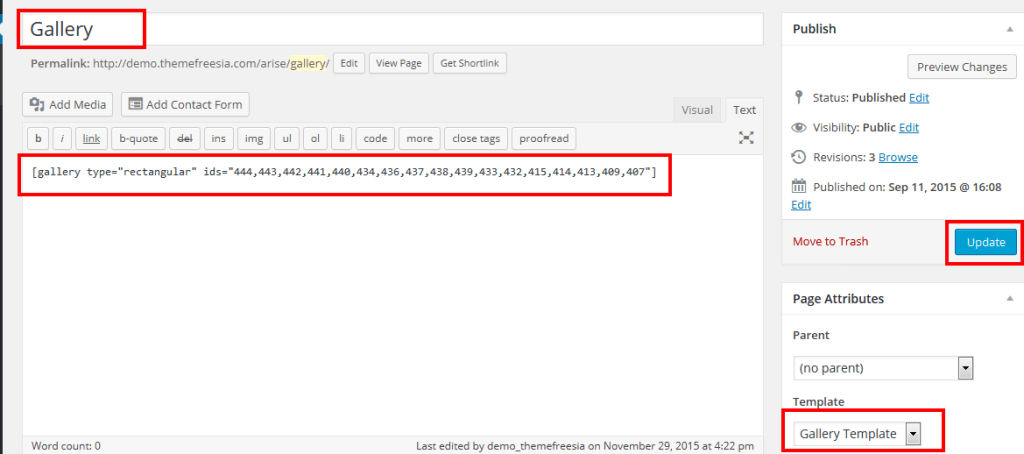
Set Gallery page
- Go to Dashboard > pages > Add New
- Click on Add Media
- Create Gallery
- Select the list of image to display at Gallery
- Click on create a new gallery
- Select Gallery Template
- Click on Update/Publish
Note: You need to install jetpack plugins to set gallery as in our demo site. To display gallery as in demo you need to install a jetpack plugin and activate tiled gallery carousel with jetpack
View link1 and Link2
Set Contact page
- Go to Dashboard > pages > Add New
- Add shortcode in page editor
- Select Contact Template from rightside of the page
- Click on Update/Publish
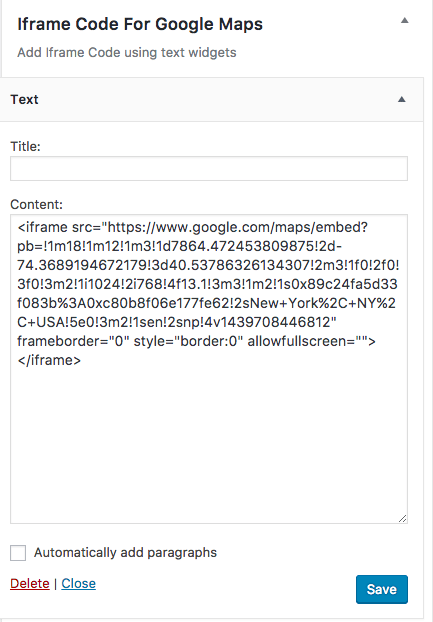
To add Google Iframe Code to display as in demo
Go to Dashboard > Appearance > Widgets > Drag Text/ Custom HTML Widget to > Iframe Code For Google Maps sidebar & Add iframe code
To add Contact Information at sidebar
Go to Dashboard > Appearance > Widgets > Drag Text Widget > Contact page sidebar & fill the contact information
Recommended Plugins
- Jetpack for Gallery & many more
- Regenerate Thumbnails for Regenerating Thumbnails
- Contact Form 7 for Contact Us page
- WP-PageNavi for Numeric Pagination
- Polylang for multilanguage
- bbPress for Support Forum
- Breadcrumb NavXT
- wooCommerce for your Shopping Site
- Recent Posts Widget With Thumbnails for thumbnail post to display on widgets
- Gutenberg
- Max Mega Menu

